さくらの980円のプランはHDDが20GB。負荷よりもHDD容量が心配になってくる。さくらのVPSのコントロールパネルではディスクのトラフィックは見れるものの容量は見れないので、別途SNMPで確認する。今回は自宅サーバでcactiを使っているのでそこで状態を表示することにした。
(3GB使用、これが真っ赤になったらヤバい)
SNMPでの情報公開
さくらのVPSで情報をSNMPで公開し、自宅サーバのcactiで取得した情報をグラフ化する。つまり、情報をインターネットごしにみなければいけない。自宅サーバがDynamicDNSを使っていてアドレスでコミニティを切りづらいのでSNMP v3で認証することにする。
SNMPをインストールする
rootで作業。公開するだけならsnmpdだけで良いがテスト接続などをしたいのでsnmpも入れる。
aptitude -t unstable install snmp snmpd
snmpdの公開設定
最低限みたいのはディスク容量だけだが、せっかくなのでひと通り情報を取得してみる。
外からもアクセス可能に。
#  Listen for connections from the local system only
#agentAddress  udp:127.0.0.1:161
#  Listen for connections on all interfaces (both IPv4 *and* IPv6)
agentAddress udp:161,udp6:[::1]:161
SNMPv1,2で使うコミニティを全部コメントアウトして、authOnlyUserではない任意の読み取り専用ユーザを作成する。
                                                 #  Full access from the local host
#rocommunity public  localhost
                                                 #  Default access to basic system info
#rocommunity public  default    -V systemonly

                                                 #  Full access from an example network
                                                 #     Adjust this network address to match your local
                                                 #     settings, change the community string,
                                                 #     and check the 'agentAddress' setting above
#rocommunity secret  10.0.0.0/16

                                                 #  Full read-only access for SNMPv3
#rouser   authOnlyUser
rouser   hogeUser
ユーザパスワードの設定。
以下のとおり、/var/lib/snmp/snmpd.confにはユーザ生成の設定は/etc/snmp/snmpd.confへとあるのでそれに従う。
###############################################################################
#
#  SNMPv3 AUTHENTICATION
#
#  Note that these particular settings don't actually belong here.
#  They should be copied to the file /var/lib/snmp/snmpd.conf
#     and the passwords changed, before being uncommented in that file *only*.
#  Then restart the agent
/var/lib/snmp/snmpd.confは動的に更新されるのでsnmpdを止めて作業。
/etc/init.d/snmpd stop
*のところに平文のパスワードを入れる。
# Only "createUser" tokens should be placed here by snmpd administrators.
# (Did I mention: do not edit this file?)
#
createUser hogeUser MD5 "***********" DES "***********"
/etc/init.d/snmpd start
これで/var/lib/snmp/snmpd.confが更新されcreateUserの行はusmUserから始まる行に変えられる(設定ファイル内のパスワードが平文じゃなくなる)
cactiで表示
デバイスを追加
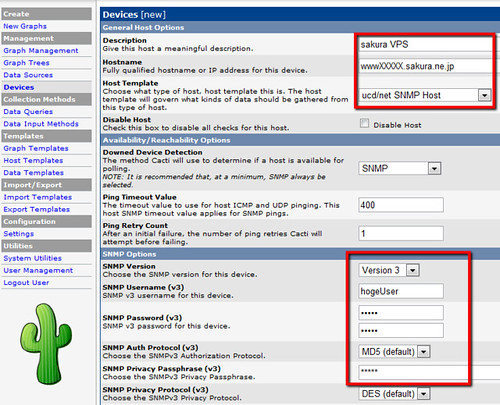
Console -> Devices > Addを押して、Host TemplateにSNMP hostを選択し、SNMPのプロトコルバージョンを3、先ほど設定したユーザをSNMP Username (v3)に入れ、パスワードはSNMP Password (v3)とSNMP Privacy Passphrase (v3)に入れる。
追加して、SNMP Informationにエラーがでていなければ成功。
グラフの追加
Console -> Create New Graphsを選んで、先ほど追加したデバイスを選択すると SNMPで取得できるシステム情報をそれぞれチェックを入れられる状態になっている。ハードディスクの容量はData Query [ucd/net – Get Monitored Partitions]の中から Mount / のところをチェックすればよい。
ちなみに、どちらかというとcactiは状態の推移をチェックするのに有効で、障害検知に特化したツールではない。HDDの容量の危険をチェックするだけなら簡単なスクリプトを書くのもあり。


